Tuesday, June 30, 2015

DIY Steampunk gauges with ICE resin mix tutorial

While I've been insanely busy with teaching myself CAD and working on my 3D Printing (more on that later), I decided to post a bit of a throw back to some good ol' hands on work. Here's a quick-n-easy tutorial on DIY Steampunk gauges using ICE Resin. I got much of this technique from Thomas Willeford's excellent book, Steampunk Gear, Gadgets, and Gizmos: A Maker's Guide to Creating Modern Artifacts. I hope to do a short review of this excellent book in a future post, but for now let's stick to the gauges. 

The main ingredient here is self-leveling ICE Resin. You can get it on Amazon for about $20, and a small kit will last you quite a bit. ICE Resin is really easy to work with, hardens very clear, and is pretty forgiving. I've used one other resin mix before and ICE Resin definitely wins out.

I start with some garden hose caps for the big gauges and some small closet handles found at my local Home Depot. The closet handles are just small eyelets about 1/4 inch deep. 

Home Depot Steampunk supplies

I had to give the gauges some backing to support the paper gauge faces I'd later add on, so I used some trusty Magic Sculpt to raise the backs up a bit. Simple enough.


Here's where I wish I was better at remembering to take photos while working on stuff, but I let my descriptions suffice. I had some pics of gauges that I got off the internet and printed at the right size. I cut out the prints and put them in as gauge faces. 

So....then...I mixed the ICE Resin according to the directions. Pretty easy and straight forward. I'm pretty horrible at following mixing directions, ask anyone who has ever seen me try to bake, but seriously this is pretty much idiot proof. Just half and half in a plastic cup mixed with a wooden stick. Wait about 5 minutes, according to directions. Actually the longer you wait, the less trouble you'll have with bubbles. So be patient. I know it's hard, but try. Go talk to your loved ones for a few minutes and then abruptly cut off the conversation when the timer goes off. Then I just gently poured a little resin in each gauge and set them in a covered container overnight. 


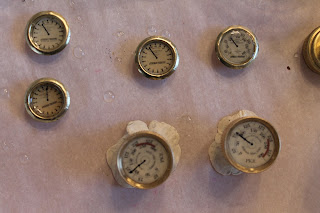
The result is some pretty cool little gauges that you can use anywhere in your favorite projects. Note that the one in the upper right hand of the photograph below has some bubbles. This picture was taken before they were put to bed overnight and I've happy to say that the bubbles dissipated by morning. 

And that's it. If it looks complicated, it really isn't. Hope you found this helpful and I'll follow up on some of the items mentioned in this post in later posts. Magic Sculpt alone deserves high praise and of course, Mr. Willeford's excellent book deserves a post all to itself since it's the book that started it all for me. 

Five Nights At Freddy's Custom Lego

So here's one that means alot to me. My son is getting into the act of creating and making by working on his own custom Legos. Even though he just started not too long ago, I think he's showing some real talent. This is his first custom lego and it's from the cult game Five Nights At Freddy's. It features a completely sculpted head! And if you think this is good, wait to you see his Nathan Drake from Uncharted.

Friday, June 19, 2015

Fallout 4 "Pip-Boy" Edition Pre-Orders now on Amazon!


Fallout 4 "Pip-Boy" Limited Edition Pre-Orders are now on Amazon! Get yours here!

If you don't know, Bethesda is releasing a limited number of Fallout 4 games with an official "Pip-Boy" that fits a device, metal case, maps, and lots of extra goodies! These limited editions are $119 on Amazon and given that any PC game runs you about $69 and Pip-Boys go for unofficial "Pip-Boys" sell for at least $100, you're coming out well ahead. I tried to get mine last week on Amazon and hesitated. By the time I came back from lunch and decided to pull the trigger, they were gone!
I am so glad they are back that I got mine as soon as I saw it available. Word to the wise: these will sell out!

Fallout 4 refrigerator magnets are here!


We are all looking forward to Fallout 4 since the big announcement last week. I made these refrigerator magnets because I loved the logo and can't wait for the game to come out. I have one at home and one in my office, and I've already gotten quite a few, "Hey where'd you get that?!"


Monday, June 15, 2015

Det. Deckard's Blade Runner gun....first look


A quick look at my version of Det. Deckard's service pistol from Blade Runner. This is a mod of a very affordable and cool little toy gun available here. I make little secret of how much I love the toy gun but now you can see why. More pics and info to follow so stayed tuned!

Thursday, June 11, 2015

Looky here! Antique Brass Spyware Replica


Antique Telescope Replica from Amazon. Amazon's got some really nice telescopes and compasses, but this one stands out for the beautiful brown leather and it's SQUARE! Not seen another like other than this company. So many possibilities for this one. "Just in time for Father's Day", I'll say to my children.....

Tuesday, June 9, 2015

Han Solo's DL-44 Heavy Blaster from Star Wars "A New Hope"


Very proud to present Geek House Creations' first Star Wars prop. If you're like me, you had a obsession with Han Solo's blaster as a kid. Sure, light sabers were awesome and "an elegant weapon for more civilized age", but the raw power of a blaster and that distinct shape were what really caught your eye. I can tell you this thing feels as good as it looks. Own it at my Geek House Creations Etsy Shop.

Sunday, June 7, 2015

Presenting the Geek House Nerf N-Strike Slingfire

Very happy to present the new Geek House Creations' Nerf N-Strike Slingfire. I honestly think this one would fit across genres. It could be Steampunk, Dieselpunk, and I could even see it as something found in Fallout. Lots of textures with wood, canvas grip and cloth wrappings near the barrel. Own it at my Etsy Shop here.


This piece is based off the excellent Nerf N-Strike available at here


Perfect atop my mantle. 


Wednesday, June 3, 2015

Tutorial: Painting Wood Grain On Plastic


This is a quick and easy tutorial on how to paint a wood grain pattern on plastic, in this case a Nerf rifle stock. I am certainly not the creator of this method, though I think I've made a few simple changes that I think simplify the process a bit.

This creates a very nice looking wood grain pattern on any plastic surface within minutes. Note: it does take up to two or three days to dry completely depending on the temperature and humidity.

You will need: black spray paint, some good white or "egg shell" color acrylic paint and some good oil paint.

For this tutorial I'm using acrylic white paint, plain ol' Flat Black Spray Can, and some oil paints. For white, I'm using Folk Art Acrylic Paint. This white paint is nice and thick, perfect for this kind of job. One quick coat and you are done. You don't want very liquidy paint for this so the thick Folk Art stuff works nicely, and it's available in alot of craft shops or Amazon.


First step is to paint your surface, in this case a plastic rifle stock, a good coat of solid flat black.

Then take a broad brush and dip it in the thick white paint. The brush should not be completely wet, though it should be a little bet wetter than a "dry brush method". You want the brush to paint a little bit unevenly and not to paint solid white on any portion.

Paint along the "wood grain". In this case, the wood grain is running horizontal across the stock. Using your moderately wet brush, lightly brush white streaks on the black painted plastic stock following the "wood grain". Remember to go lightly at first and adjust pressure and wetness as you got along. The goal is to get white streaks across the grain. Don't worry if some spots are lighter or darker than others or if there are some irregularities in the pattern. Wood is pretty irregular. In fact, I use the irregularities to create some "knots" in the wood.


Now comes the fun part! Your going to need some Burnt Umber, some Cadmium Red, and maybe even some Yellow Ocher. You can get all these paints in a Basic Oil Paint Set. I'm using the Windsor & Newton Set that's got all these paints and a few more for pretty cheap.

Squeeze some Burnt Umber on a piece of paper (newspaper is perfect) and prepare to paint. Why paper? Because paper will absorb some of the paint's oil and allow for quicker drying time. Take a broad brush and brush some of the Burnt Umber, and again brush along the pattern of the white wood grain. If there are any indentations in the surface, let the oil paint collect there and make it darker. You should be begin to see something that looks like wood grain start to form.


If you're feeling particularly brave you can take some Cadmium Red and apply a few dots in select areas and brush in, always across the grain. You will see some nice coloration in the wood. Red will give a nice deep color; Yellow Ocher can give the wood more of an faded aged look. The nice thing about painting with oils is that they are pretty forgiving. If you put some yellow on and don't like, just brush over some more Burnt Umber and mix in. All will be forgiven.

Once you've achieved a nice wood grain effect, leave your stock to dry over the next two days or so. Depending on the heat and humidity, drying time can take up to four days. Before then, it will smudge easily and feel sticky. Hot temperatures will speed up the drying process. I left my stock out on my deck on a sunny summer's day, and it was mostly dry by the end of the day, but you can't always count on a sunny summer day. Sounds philosophical doesn't it? "You can't always count on a sunny summer day". Deep.

And that's it. Hope this helps everyone with all their faux wood grain! Tell you the truth, it's a little a addicting. Once you see the nice wood effect on something, you suddenly want to give everything a wood look. I live in a fake wooden cabin now.

Fallout 4 Official Trailer.

Remember that scene in The Jerk where Steve Martin is jumping up and down with uncontrollable excitement because the new phone books arrived? That's sedate compared to how excited I am right now. The new Fallout 4 trailer is here! The new Fallout 4 trailer is here! Things are going to start happening to me now.