While I've been insanely busy with teaching myself CAD and working on my 3D Printing (more on that later), I decided to post a bit of a throw back to some good ol' hands on work. Here's a quick-n-easy tutorial on DIY Steampunk gauges using ICE Resin. I got much of this technique from Thomas Willeford's excellent book, Steampunk Gear, Gadgets, and Gizmos: A Maker's Guide to Creating Modern Artifacts. I hope to do a short review of this excellent book in a future post, but for now let's stick to the gauges.
The main ingredient here is self-leveling ICE Resin. You can get it on Amazon for about $20, and a small kit will last you quite a bit. ICE Resin is really easy to work with, hardens very clear, and is pretty forgiving. I've used one other resin mix before and ICE Resin definitely wins out.
I start with some garden hose caps for the big gauges and some small closet handles found at my local Home Depot. The closet handles are just small eyelets about 1/4 inch deep.
 |
| Home Depot Steampunk supplies |
I had to give the gauges some backing to support the paper gauge faces I'd later add on, so I used some trusty Magic Sculpt to raise the backs up a bit. Simple enough.
Here's where I wish I was better at remembering to take photos while working on stuff, but I let my descriptions suffice. I had some pics of gauges that I got off the internet and printed at the right size. I cut out the prints and put them in as gauge faces.
So....then...I mixed the ICE Resin according to the directions. Pretty easy and straight forward. I'm pretty horrible at following mixing directions, ask anyone who has ever seen me try to bake, but seriously this is pretty much idiot proof. Just half and half in a plastic cup mixed with a wooden stick. Wait about 5 minutes, according to directions. Actually the longer you wait, the less trouble you'll have with bubbles. So be patient. I know it's hard, but try. Go talk to your loved ones for a few minutes and then abruptly cut off the conversation when the timer goes off. Then I just gently poured a little resin in each gauge and set them in a covered container overnight.
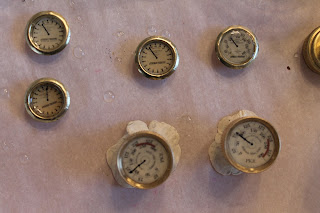
The result is some pretty cool little gauges that you can use anywhere in your favorite projects. Note that the one in the upper right hand of the photograph below has some bubbles. This picture was taken before they were put to bed overnight and I've happy to say that the bubbles dissipated by morning.
And that's it. If it looks complicated, it really isn't. Hope you found this helpful and I'll follow up on some of the items mentioned in this post in later posts. Magic Sculpt alone deserves high praise and of course, Mr. Willeford's excellent book deserves a post all to itself since it's the book that started it all for me.


I would also recommend pre-drilling a small hole in the bottem of the gage body and threading a small screw through before filling with putty.
ReplyDeleteExtra screws from a Nerf gun work great.
That way you can securely attach the gage to any surface without glue.
I did that with some of them but forget to take pics. :(
ReplyDeleteGreat tip.
I did that with some of them but forget to take pics. :(
ReplyDeleteGreat tip.